a blog formerly known as 'by amanda leigh'

Monday, May 30, 2011

A solution for wedding memorabilia!

Today is the first day in a while that it's been nice here in town. We've been hit with a lot of rain lately and it has put a serious damper on the 'happy summer vibes' I've been desperately in need of. Today without a doubt is going to be gorgeous. Couldn't ask for a better Monday to start off a long week at work.

With the wonderful weather, weddings begin. In just a fwe weeks my first wedding of the year will be here - and I'm very excited. If the bachelorette party we just had this past weekend for the bride means anything, that wedding is going to be one heck of a party. And with weddings come memorabilia.

I know, you're probably thinking "what the heck does she mean?", but trust me, I like to keep things from the weddings I attend to have a bit of a keepsake from the day. At one point last year, after we went to our very last wedding, I opened this box where I kept all these things and didn't know what to do with everything.

And shortly thereafter, I was in the dollar store (seriously, what CAN'T you find there?) and I fell upon these frames and an idea hit me! I was going to make a type of 'shadow' box to hang on my walls which displayed a photo of the married couple, along with some of the mementos from their big day. My friends are very dear to me, all of them family, so showing off their happy day seemed like a no-brainer for me.

Most of them don't have the picture of the couple in them just yet, I stil have to go and buy hooks to place on the back of the frames so I can hang them from the walls. Because I wanted these to last a long time on my wall, I opted to use a glue gun rather than normal glue just so they would stay put. Overall I think these are a great way for me to look back and remember what a great time was had. Once I get all of these mounted on my wall I'll post a picture of that.

Here are the couples - displayed in order of when we attended them...

Bianca and Matt

Bianca and Matt had this gorgeous wedding that had a Mary Antoinette feel to it. Pearls, masks, ostrich feathers - it was a sight to see. And it was a great wedding to kick start my 2010 wedding season.

The bonbonieres were little Faberge eggs. How friggen cute is that? And the pewter flower was place card holder. Bianca did all the place cards and decorating herself. She's awesome.

Caroline and Matt


Some weddings didn't have as much stuff to sneak into my purse (or into my boyfriend's jacket pockets), and at my best friend's wedding (the photo frame above) I was too busy being a Maid of Honor to take anything. In this case I used these adorable stickers from the dollar store to compensate.


Junior and Vanessa

Another wedding where I was having too much fun running around. If you've ever wondered if someone wearing a dress to a wedding was capable of doing the worm on the dance floor, this would have been the wedding to answer that. Junior and Vanessa had the cutest place card holders ever:

Fortune cookies!!!! And their bonboniers were keyboard cleaners - so practical, keyboards are seriously full of dust all the time - that were either a little bride or a little groom.

Christine and Paul

Not only was this the wedding where two of my oldest friends took each others hands in marriage, but this was the wedding where I was able to create a headpiece for the bride. It was a really special day. And to top it all off there was a ton of stuff on the table to take!! I actually have and extra pumpkin and table number picture frame. I went a little wild, what can I say...


Tracy and Richard


Tracy and Richard are a very modern styled couple. Their wedding was at a venue which is basically set up as you see fit. Their space was filled with extra large balloons floating above the tables, test tubes holding orchids hung above the head table, and long rectangular tables took place of the traditional round ones. It was an awesome night - and again, I was busy not only being a bridesmaid, but chasing my very photobooth happy duaghter around (Tracy and Richard had a photobooth at their wedding and my daughter was the official button presser).

Now that I'm in the groove of things, I just need to go out and buy 4 more frames for this upcomming wedding season! Hurray for weddings!

Friday, May 27, 2011

Here's to the future...

May 25th, 2011 was the day I had my biggest "Aha-Moment" up to date. It was the day I decided to make a change in my life. I sat at home on my couch and watched as Oprah took to her stage for one last show. Her words moved me to tears - my eyes weren't dry once during the hour-long finale.
"[A calling] lights you up and lets you know you're exactly where you're supposed to be, doing exactly what you're supposed to be doing. Live from the heart of yourself. You have to know what sparks the light in you so you in your own way can illuminate the world."
I have spent countless hours of my life wondering if there was any reason to strive for greatness. I never really thought I could make a difference or that anything I could do would mean anything. Oprah touched a part of my soul in her last show that I have been trying to find for years. Her words resonated through my television and she made me believe in myself.

It almost seems ridiculous to think that someone I've never met - someone who does not know me or my personal battles - could move me in such a way that faith in myself has been reinstated. I not only believe, but I now KNOW that I am destined for so much more than I give myself credit for. Thinking about how her show made me feel still makes me misty-eyed...
“There’s a difference between thinking you deserve to be happy and knowing that you are worthy of being happy. Your being alive makes worthiness your birthright. You alone are enough.”
I have hesitated for so long to put myself out there because I've felt like I don't merit being able to do the things I love. There are so many talented people out there that I've felt like I would not compare, like I would never make it. I could not have been more wrong.

My heart is filled with hope and faith in myself - something I have not had for a long time - and I foresee a great future ahead of me.

Here’s to a future filled with excitement, wonder, hope and faith. Thank you Oprah for opening my eyes and making me realize that I am worth it.

Wednesday, May 25, 2011

If at first you don't succeed...

Try try again!!!


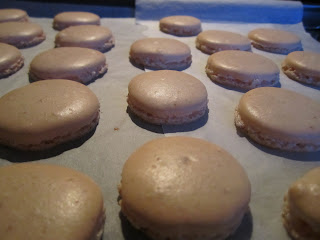
I am speechless. I did it. I made macarons that were not horrible. That were cooked through and didn't stick to my parchment paper (note to self: must invest in a few Silpats...). I will admit, I made an attempt last night, and although they looked perfect, they were far from it. 


Chunky and the feet are too uneven for my liking.

The golden color is not added, it's due to me slightly overcooking the macarons. Hey, it was my sixth attempt - or wait, was it my fifth? - well let's just say I've tried this a time or two already and failed each time almost more miserably than the last. But something we running through me today that gave me the will to make them again.


And I did and I could not be happier with the results. I did try my own spin on it... I made the basic recipe (I follow Tartelette's recipe - hers is the only one I've attempted that's worked for me. Just go to her site and search for "macaron". She is a complete genius when it comes to flavour combinations.) with a twist. I took out part of the almonds and added in walnuts instead. It gives it a bit of a different flavour to it. Inside I made a Banana Buttercream Frosting.


Look at the feet! Just the way they should look!

I did take the advice of the my above mentioned macaron inspiration, and this time around I ground up the almonds, walnuts and icing sugar together in my food processor at the same time. This is the first time I didn't have to re-process a huge amount of leftovers. I let the processor have its way with the ingredients for a minutes, scraped the edges, and then did it for another minute. You can 100% see a difference in yesterday's macarons texture compared to today's. Yesterday I ground up the almonds on their own, and they were fairly chunky. Today, much smoother.

Fresh from the oven...

I couldn't be more excited with the end product. My boyfriend wasn't complaining either - and he's pretty honest when it comes to my baking - he had three of them. After a fairly uneventful day at work, these darling creations saved me.

I can't wait to figure out what kind to do next...

Tuesday, May 24, 2011

Take a bite...

My first time trying these and it will not be the last...

A wonderful friend of mine, Bianca (link website) turned me on to this amazing website which I have fallen head over heals for. Bakerella is her name and sweet baking is her game. I have been looking over her site for weeks and decided to give one of her recipes a try.
 
You can't make a Red Velvet cake without A LOT of red food coloring...

My daughter is a huge lover of all things sweet, so when I asked her if she would rather me make a pop cake, or a cupcake bite, she went with the cupcakes. I decided on the red velvet recipe of hers for the base, and rather than using a cream cheese icing I have decided to go with a simple vanilla buttercream. Here is the recipe of hers, but you can see her full entry on this cake (here):

Red Velvet Cake

2 1/2 cups all purpose flour
2 cups sugar
1 Tablespoon cocoa
1 teaspoon salt
1 teaspoon baking soda
2 eggs
1 1/2 cups oil
1 cup buttermilk
1 Tablespoon vinegar
1 teaspoon vanilla
2 oz. red food coloring
Preheat oven to 350 degrees.
Grease and flour two 8 inch cake pans.
Lightly stir eggs in a medium bowl with a wire whisk. Add remaining liquid ingredients and stir together with whisk until blended. Set aside.

 
I seriously thought that I had put way too much red coloring, the liquid mixtures turned out bright fuchsia.

Place all the dry ingredients in your mixing bowl and stir together really good with another wire whisk.
Add wet ingredients to the dry ingredients and mix on medium-high for about a minute or until completely combined.
Pour into cake pans and then drop the pans on the counter a few times to release any air bubbles.
Bake for about 30 minutes or until a toothpick inserted comes out clean.
After about ten minutes, remove from pans and cool completely on a wire rack. I also cover in plastic wrap while the cakes cool.
Then make the frosting.Fm there I made a simple buttercream and once that was done the fun began. I broke the cake up into a crumble, and then I added the buttercream and mixed. At first I was being all dainty and was using a spoon, but I decided to be at one with the cupcake bites and I started using my hands.

 This was probably my favorite part... Getting my hands dirty.

Flashbacks of being a child playing with play dough came to my head :). Once it was mixed as well as I assumed it would need to be, I started to make tiny quarter sized balls of the cake-icing mixture and set them aside on a parchment paper lined baking sheet.

 
Getting these just the right size was tough, I kept making them too big and had to eat some of the bad ones. Oh darn...

I let them settle in the freezer for a few minutes and followed the rest of the recipe. Make the chocolate cups by ,doting some chocolate into little chocolate cups molds, put a cake ball in cup, freeze a bit more, pop out and decorate. Im breaking it down incredibly fast, but if you head on over to the Bakerella website, you can find recipe after recipe of different ways to make these. And a much more in-depth way of making these.

 
Decorating the cupcake bites was my favorite part. I melted down some purple wafers, dipped my cupcake bites in and sprinkled them with little cupcake toppings. SO. MUCH. FUN.
And I have to say, they taste pretty darn good. Bakerella knows how to make one mean red velvet cake.
Take a look at how they turned out...


I heart baking.

Tuesday, May 3, 2011

Never judge a book by it's cover...

After an impromptu family get-together last night at our place, I decided to give it a go at making macarons. I had been hearing more and more about them through a Facebook friend and I wanted to see if they were as temperamental as I had read up on.

I had all the ingredients necessary, and everything seemed to be going so well. My almonds grinded without a hitch, my egg whites formed the perfect peaks, my batter looked and felt like the right consistency. I was even able to make every macaron almost identical in size - well, as good as a first timer could make them of course.

I continuously went back to the oven to make sure that my macarons were forming their perfect feet - they were! - and that the tops were smooth and glossy - a success! - and even after I took them out of the over I could barely believe my eyes.


I was a natural! All the blogs I had read about them lied to me! These were not hard to make, either that or I must have a natural ability for them. My mind starts reeling about all the different recipes I searched and how I can start baking these all the time - they were so simple! - and how people will come running by the truck loads to buy them from me.

And half an hour later, after I've let them cool down, my dreams came crashing to a halt.


I went to take one off the baking sheet and all I held in my hand was the little perfectly smooth and glossy dome. The bottom half remain on my baking sheet, stuck to the bottom and under cooked.

Little did I know that these pesky little buggers would become the bane of my baking existance. I have tried three times since and have yet to perfect them. I will, however, not give up so quickly. So for now I leave my adventures in macarons on the back burner, I think I'll stick to banana muffins for now...